|
Wide Format Printing on aoc324w
About
The general-purpose wide-format printer at the AOC, named
aoc324w, is a 42inch HP Designjet Z6200ps. It is capable of
printing resolutions up to 2400x1200 dpi, and uses 8 dye inks (C, LC,
Y, M, LM, PK, MK, LG). We predominately keep 36inch draft paper in
the printer for common page sizes like ANSI E (34" x 44") and Arch E
(36" x 48"), but we do have a supply of 42inch paper as well. We also
have photo grade paper in both 36 and 42 inches. Please contact
the helpdesk if you need different paper as the procedure has
changed.
AAS requires posters to fit within a 44" x 44" square area.
Printing via the Web
First, save the document in a printable format (either PDF, PS, TIF, JPG).
Next, connect to the printer's
web page and select Submit job from the left-hand
column.
Step 1. Select the files you want to submit
Type in the path to the file you just saved, or click
the Browse button to browse to the file.
Step 2. Select the settings for the job(s) and press the Print button
Below are the most common settings you may want to change before
submitting your job.
- Job settings -> Basic settings -> Hold for preview
Setting this to Yes will allow you to view the job as it
would come out of the printer. This is very useful to make sure your
rotation, size and other settings are correct before you put ink to
paper.
- Job settings -> Basic settings -> Print
quality
If you change this to Standard you can now
change the standard options below from Speed to Quality.
If you chance this to Custom you can select some compromise between
Fast and Best, but bear in mind that
Best means slower printing. It is not usually necessary
to change these options as the printer does a good job of selecting
the right options based on the paper loaded.
- Job settings -> Advanced settings -> Paper
By default, the printer does a good job of guessing how much paper you
job needs. However, you may want to change this if the preview shows
lots of blank paper with your image or if you know you want a specific
paper size. Note: this only sets the size of the paper. It
does not change the size of the image. To change the size of the image,
see Resizing options below.
- Page size = Standard
With Page size set to Standard, you can
set Size a pre-defined paper size like ANSI E (34" x 44"), Arch E
(36" x 48"), ISO A4 (210mm x 297mm), etc.
- Page size = Custom
With Page size set to Custom, you can
set the Width and/or Length. If just one is set, the printer will
scale the other dimention.
- Job settings -> Advanced settings -> Resizing
Ideally, your image should have been sized correctly by the software
which created the image. However, you can resize images here as well.
Note: You should not set both the Page size
and Resize options. Usually you will want to only
set the Resize options and leave the
Page size set to Default.
- Resizing = Standard
With Resizing set to Standard, you can
resize an image to a pre-defined size like ANSI E (34" x 44"), Arch E
(36" x 48"), ISO A4 (210mm x 297mm), etc.
- Resizing = % of actual size
With Resizing set to % of actual size,
you can resize an image to a user defined percentage. This is
useful for some PostScript files that look letter size instead of
poster size. In that case, try setting the percentage to 400%.
- Resizing = Custom
With Resizing set to Custom, you can
resize an image to a user defined Width and/or Length. If just one
is set, the printer will scale the other dimention.
- Job settings -> Advanced settings -> Roll options ->
Rotate
Rotate can be set to rotate your image 0, 90, 180 or
270 degrees counter-clockwise. Sadly, if Resizing has
been set, the image is resized first and then rotated.
When you are finished with the settings, click the
Print button, then select Click here to
check progress in the job queue to view your job in the Job
queue.
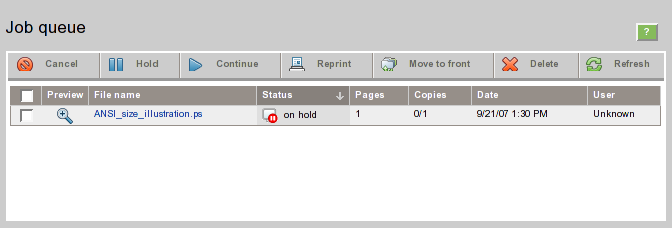
You may have to wait while the job continues to process. You will
know the job is ready when the magnifying glass appears in the
Preview column. Try clicking the
Refresh button in the upper right corner to check the
progress of the job.
When the magnifying glass appears, click on it to get a preview of
your print job.
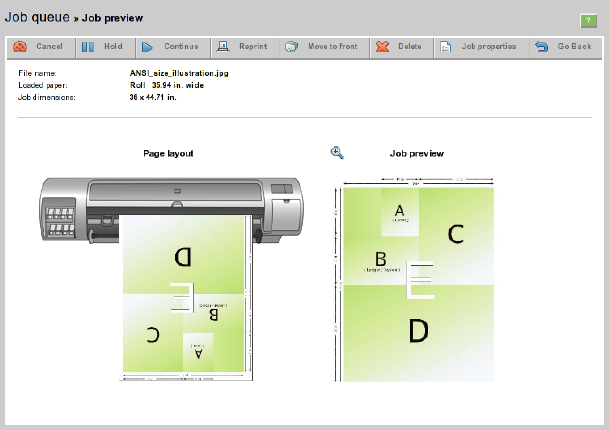
If the Job preview looks correct, click the
Continue button to actually start putting ink to
paper or, if the job doesn't look correct, you will have to click the
Delete button and print your job again.
Printing via Windows
If you do not have \\aocpfsa\aoc324w installed in your list of
printers, follow these
directions to install it.
When printing to aoc324w, you will want to use the
Properties window to change the Document
size to match the size of your document e.g. ANSI E (34" x
44"), Arch E (36" x 48"). You may also want to set the Print
Quality. Basicly, for a draft printing, use inkjet paper and
Speed quality. For a final printing, use glossy paper and
Quality quality.
By default, printing to aoc324w from Windows doesn't actually put
ink to paper, but instead sends your job to the Job queue. Once sent,
connect to the printer's web
page, select Job queue. Locate your print job in
the list of jobs and click on the magnifying glass to get a preview of
your print job.
If the Job preview looks correct, click the
Continue button to actually start putting ink to
paper or, if the job doesn't look correct, you will have to click the
Delete button and submit your job again.
Printing via UNIX
Printing from UNIX can be as simple as...
lpr -Paoc324w filename.ps
or selecting aoc324w from your application's printer list.
By default, printing to aoc324w from UNIX doesn't actually put ink
to paper, but instead sends your job to the Job queue. Once sent,
connect to the printer's web
page and select Job queue. Locate your print job
in the list of jobs (this may be difficult because at the moment,
printing from UNIX does not display the username) and click on the
magnifying glass to get a preview of your print job.
If the Job preview looks correct, click the
Continue button to actually start putting ink to
paper or, if the job doesn't look correct, you will have to click the
Delete button and print your job again.
For the experienced wide-format printer, you can use something like
the following to print directly to paper on aoc324w, but this is definatly
not recommended...
lpr -Paoc324w/nohold filename.ps
Troubleshooting
- The printed image is only 8.5 by 11 in size, or other small format.
- The page size was probably set to Letter or some other small
size in your document creation software. Try changing the
page size in your software to ANSI E (34" x 44") and print
again, or submit your job through the
printer's web page and
set Job settings -> Advanced setting -> Resizing -> Resizing
-> Standard -> Size to ANSI E (34" x 44")
If that doesn't work, try submitting your job through the
printer's web page and
set Job settings -> Advanced setting -> Resizing -> Resizing
-> % of actual size to 400
- Images are not centered on the page.
- While the old Fiery box for the HP 2800CP would center images on the
page, the new HP Z6100ps does not. I don't know how to center images
with the new printer. You can avoid the problem by making your
image the same width as the paper e.g. 36 inches.
- Don't get the username when printing from UNIX.
- This is a known problem with no fix as of yet.
Content reviewed on: 19-Sep-2007
Reviewed by: krowe
|
